


Table of Contents
Online Businesses are now ruling the world. Every business that indicates its presence online always reached the required fame. The first requirement of an online business is a website, which requires the domain name and hosting. You may be a beginner, or a professional digital marketing specialist, here is your way to get your own website within 5 minutes. In this article, we are going to discuss how to register a domain name and get web hosting with SeekaHost.
About SeekaHost?
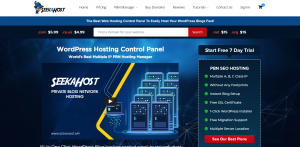
SeekaHost is a WordPress hosting control panel that is the leading domain name and web hosting provider in London. They are available in two different variations to get your own website manually or automatically. SeekaHost is the first to bring the automation technique in providing domain name and web hosting. No problem that you are a beginner or experienced blogger, here you can buy your own domain name with hosting within 5 minutes by following the simple steps given below.
SeekaHost is also called as SeekaPanel, and you can visit the website seekahost.app which is fully automatic, and anyone can buy your own website within minutes. This tool was built by Fernando Raymond who is a leading digital marketing specialist in London.
Features in SeekaHost.app
- The servers come with the DDOS protected solution
- You can host your PBNs with the unique IP from different locations
- The servers are more secured with the Periodic Malware Scanner
- The blog management will be simple and user friendly
- 24/7/365 live customer support
- 1-Click WordPress installation
- Free SSL Certification
- Free website migration
- You can track your site
Step-by-Step Procedure to buy a Domain Name and to get Web Hosting:
As a beginner, you will have many questions on how to get a domain name and web hosting. Web hosting is a process of providing storage for your website which is used to store all your files, images, and other essentials in your allocated storage. The service is given with different charges for different plans, and we will discuss that now. Here, I have given the step-by-step procedure to buy a domain name and to get web hosting.
Before getting into the procedure, you should be aware of your buying domain name and its availability. You can also search for the availability in SeekaPanel. This is all one app for the entire process of buying a domain.
Step-1: Check the Domain Name Availability
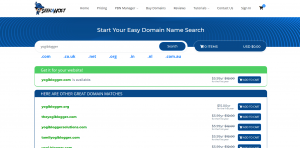
The first and foremost process is to check the availability of your chosen domain name. Visit SeekaHost.app and enter your chosen name in the search bar and click on search. It will show you the availability of your name in different extensions like .com, .org, .co.uk, .in, .online, etc., and you can choose according to your need and the availability in different extensions.
Step-2: Create an Account
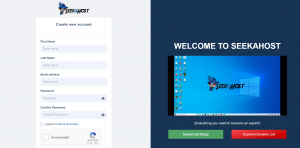
Before getting ready to buy your website you will need to create an account on SeekaPanel. Enter your name, e-mail, and password, you can create your own account after accepting the terms and conditions. Click on Create New Account for account creation.
Step-3: Buy a Domain Name

Login to your account and click on Domain Names in the tab available on your left. You will get existing domains and new domains. To register a new domain name, click on Register Domains. Enter your chosen name in the search bar and click on Add to Cart followed by Checkout to complete the purchasing process.
Here is your live tutorial for the Cheap .com Domain Registration at SeekaHost.
Step-4: Buy WordPress Hosting Plan
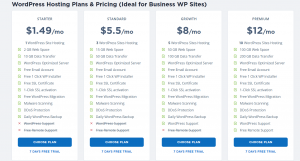
The hosting is given with different specifications for different rates. You can choose according to your needs and economy. You can also choose your Cheap PBN hosting plans in the same tab Hosting Plans.
Check out this video to experience a live tutorial to host your PBN sites with the best PBN Manager tool.
Step-5: WordPress Installation
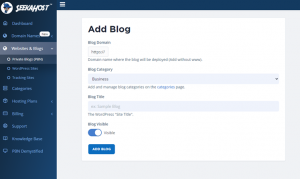
SeekaPanel provides the WordPress installation in a Single Click. Click on the Websites and Blogs and chose the WordPress Site tab to add your website with the WordPress. Provide your site name, URL, and Category and click on Add Site, the same procedure should be followed to add PBNs in the Private Blogs tab. Once you finished this, you will get an E-mail with the Username and Password for your WordPress site.
Step-6: Change your Nameservers
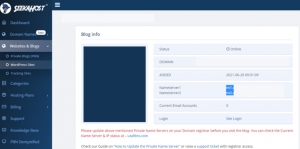
A nameserver is an IP, which is provided for each domain. Because Google and Bing can be able to read only the encrypted data. So, it is important to update your nameservers, and this can do by clicking the Nameserver option. This nameserver should be updated manually on other hosting providers, but SeekaPanel gives you simple steps to update your nameservers.
This should be done in the place where you buy a domain. Click on settings on the Right side and go to Nameservers. You will be given 2 name servers as ns1 and ns2. Paste both the servers and delete other name servers. Click on save, you will be intimated about your name server update with the IP Address in your registered mail.
Here is the complete configuration to register your custom and private Nameservers within a click.
Step-6: Activate SSL Certificate
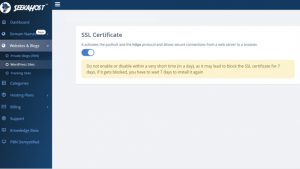
Like other hosting servers, SeekaHost will not make any difficult steps. You can activate the SSL certification with a single click. This can be done by clicking the SSL tab on your right. Enable the SSL option to activate your SSL certificate for your website. This will also be mailed to your registered mail id.
Conclusion
Now, it’s all set, and your website is ready to build. Login to your WordPress site by using /wp-login.php and enter your login details. This will direct you to edit your whole website according to your wish, and you can contact the SeekaHost professionals at any time if needed. Thus, we end up this article and I ensure that now you will be aware of registering a domain name and web hosting. Please leave your comment below if the blog is useful and follow up with the I Do Business blog for further updates.